
I’m going to attempt a more complex game in p5.js using sprites and multiple levels. My game will be about a bee who needs to collect honey from flowers before they go back to their hive. It will be played on a grid.

The first thing I did was prepare a set of sprites.
Grid Setup
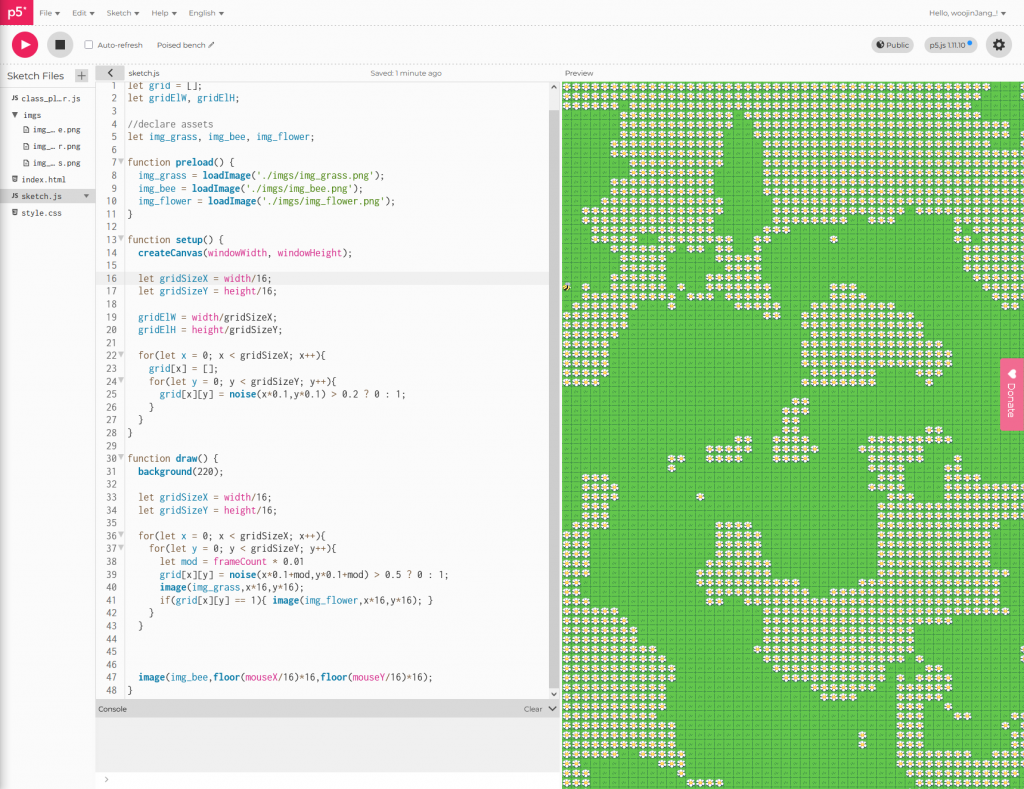
I first set up a grid using nested (or two dimensional) arrays. And tested drawing sprites to the screen, aligned to the grid.
The flowers seen in the image are generated using p5’s noise function. I made it scroll by shifting the noise coordinates by the frameCount. It makes a cool effect but I’m not going to use it for my game.
Input Setup
p5 has a built-in KeyIsPressed() function but I won’t be able to use it within a class method. So I’ve decided to make my own input variables keypress and keydown
//declare variables
let keydown = false;
let keypress = false;

function draw(){
  [...]
  keypress = false;

  if(keyIsPressed && !keydown){
    keydown = true;
    keypress = true;
  }
  if(!keyIsPressed){ keydown = false; }
  [...]
}
keypress is true on the first frame the key is registered whilst keydown is true while the key is held down.
Player Object
I’m using a familiar structure for game objects with constructor, step and drawself methods. These mirror ‘Events’ in GameMaker Studio.
I declare the Player object as a class with x, y, and moves. x and y represent the player’s grid coordinates not the screen coordinates.
class player {
  constructor(x,y,moves){
    this.x = x;
    this.y = y;
    this.tx = x;
    this.ty = y;
    this.moves = moves;
  }
}
I can then use the step event to let the user move the player character around by pressing the arrow keys on their keyboard.
step(){
  //handle inputs
  let keyUp = keypress && keyCode == 38;
  let keyDown = keypress && keyCode == 40;
  let keyLeft = keypress && keyCode == 37;
  let keyRight = keypress && keyCode == 39;

  this.x += keyRight - keyLeft;
  this.y += keyDown - keyUp;

  this.drawself();
}
I then draw the character to the screen, translating the grid coordinates to screen coordinates.
drawself(){
  image(img_bee,this.x*gridElW,this.y*gridElH-hover);
}
The player now moves around the screen, but it feels very jumpy. I’m adding two new variables to solve this target x and target y. Instead of directly changing the bee’s x and y coordinates we will change their target and interpolate them to make a smooth animation.
[...]
this.tx += keyRight - keyLeft;
this.ty += keyDown - keyUp;

this.x = lerp(this.x,this.tx,0.5);
this.y = lerp(this.y,this.ty,0.5);
[...]
I will also add a slight hover to the bee so that it ‘flies’ over the ground. This is purely visual so it can go directly into the drawself() method.
drawself(){
  let hover = sin(frameCount*0.1)*2+2
  image(img_bee,this.x*gridElW,this.y*gridElH-hover);
}
The bee’s movement is now far smoother and much more pleasing to look at. This also helps the player track their character as well.
Collision Checks
I want to implement a quick and simple collision check when the player inputs a movement key. This can be done by checking the grid element the player is attempting to move to to see if it’s collidable.
let checkX = min(max(0,floor(this.tx)+dx),grid.length-1);
let checkY = min(max(0,floor(this.ty)+dy),grid[checkX].length-1);
I need to clamp the checked values so that I don’t try to access values outside the grid array.
let collisionCheck = grid[checkX][checkY];

if(collisionCheck == img_rock || collisionCheck == img_rock1){
  dx = 0;
  dy = 0;
}
If the position checked is a rock, then it stops the movement from happening.
Loading Levels
As a side-project I did some more tinkering with using the p5 noise function to generate levels.
I used different values of perlin noise to decide whether to generate grass, flowers, water or rocks.
for(let x = 0; x < gridSizeX; x++){
  grid[x] = [];
  for(let y = 0; y < gridSizeY; y++){
    grid[x][y] = img_grass;
    if(noise(x*0.2,y*0.2) < 0.35){ grid[x][y] = random([img_rock,img_rock1,img_grass]); }
    if(noise(x*0.2,y*0.2) > 0.50){ grid[x][y] = img_flower; }
    if(noise(x*0.2,y*0.2) > 0.60){ grid[x][y] = img_water; }
  }
}
Actually loading a level is far simpler. I wrote a function to match a pixel to an array.
function matchPixel(arr1,arr2) {
  return (arr1[0] == arr2[0] && arr1[1] == arr2[1] && arr1[2] == arr2[2] && arr1[3] == arr2[3])
}
This has to be done because JavaScript does not allow for comparing two arrays directly.

Levels are stored as images with each pixel representing a tile on the grid.
| Colour | Tile |
| GREEN (‘#00FF00’) | Grass |
| WHITE (‘#FFFFFF’) | Flower |
| BLACK (‘#000000’) | Rock |
| YELLOW (‘#FFFF00’) | Hive |
I use a row of if statements to load the correct tile for each pixel.
function loadLevel(level) {
  let gridSizeX = level.width;
  let gridSizeY = level.height;

  for(let x = 0; x < gridSizeX; x++){
    grid[x] = [];
    for(let y = 0; y < gridSizeY; y++){
      let getpixel = level.get(x,y);
      grid[x][y] = img_grass;
      if(matchPixel(getpixel,[0,0,0,255])){
        grid[x][y] = img_rock;
      }
      if(matchPixel(getpixel,[1,255,0,255])){
        grid[x][y] = img_grass;
      }
      if(matchPixel(getpixel,[255,255,0,255])){
        grid[x][y] = img_hive;
      }
      if(matchPixel(getpixel,[255,255,255,255])){
        grid[x][y] = img_flower;
      }
    }
  }
}
This makes it very easy to create new levels and new tile types can be created (up to 16.7 million tile types).
Interacting with Tiles
I already check the tile the player is moving to and store it in the collisionCheck variable. I can use an if statement to check when the player moves to interact with tiles that the player character moves on to.
if(dx+dy != 0){
  if(collisionCheck == img_flower){
    this.moves += 4;
  }
  if(this.moves <= 0){
    this.die();
    dx = 0;
    dy = 0;
  }
  if(collisionCheck == img_hive){
    currentlvl++;
    loadLevel(lvls[currentlvl]);
    this.die();
    dx = 0;
    dy = 0;
  }
}
I check if the player is on a flower and add 5 movement points,
I check if the player has 0 or less moves remaining and kill it, as well as stopping it from moving.
I check if the player is on a hive and load the next level.
die(){
  this.tx = 1;
  this.ty = 1;
  this.moves = 5;
}
The death function simply resets the bee’s position and movement points.
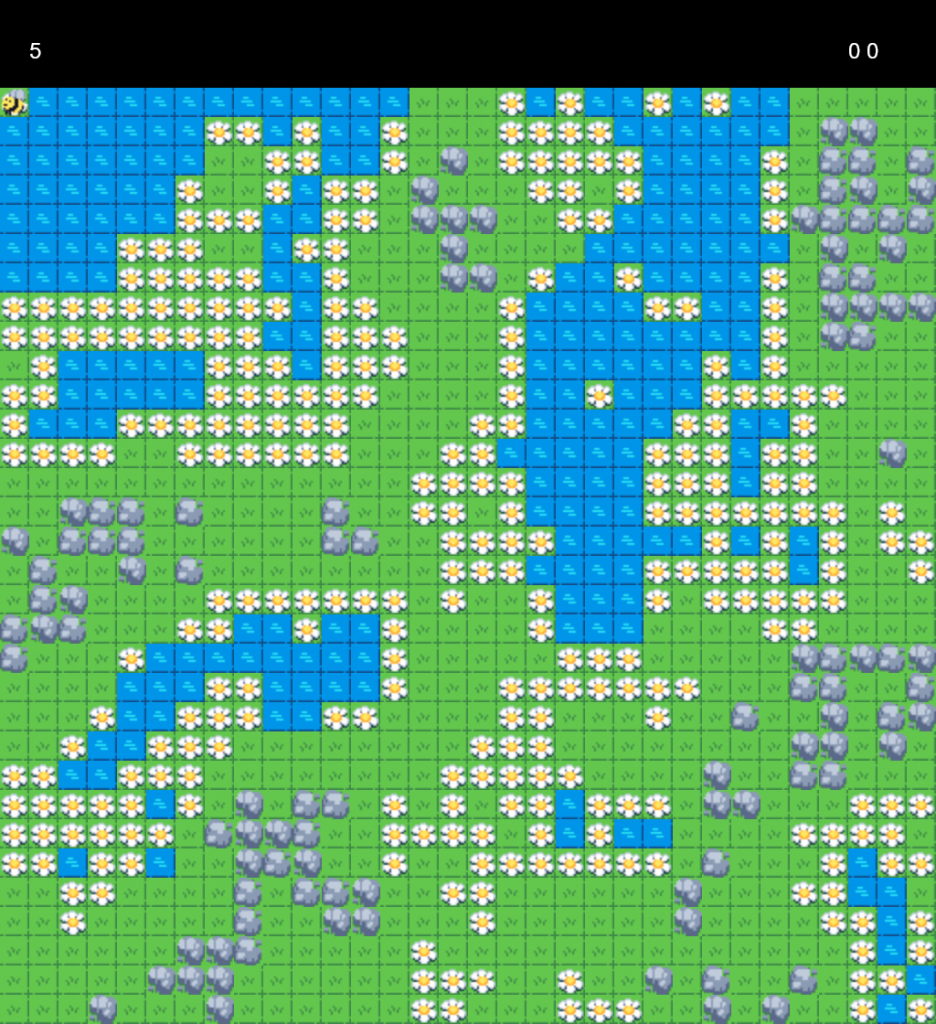
Final Game

There are many areas of potential improvement, but the game is basically complete. I used just a few simple levels to show off the basic gameplay but more complex features and better designed levels can easily be added in.